
Azure DevOps - Improve build time

During our last retrospective, one of the complaints was that the build time was too long. We were using the Hosted Build Services on Azure and restoring the NPM packages on every build took way too long.

Fortunately, Azure DevOps now offers a new build task called cache task. This task will restore the cached data based on the provided inputs. Let’s see how we can use this task to cache our NPM packages:

  • Add the cache task to your build steps

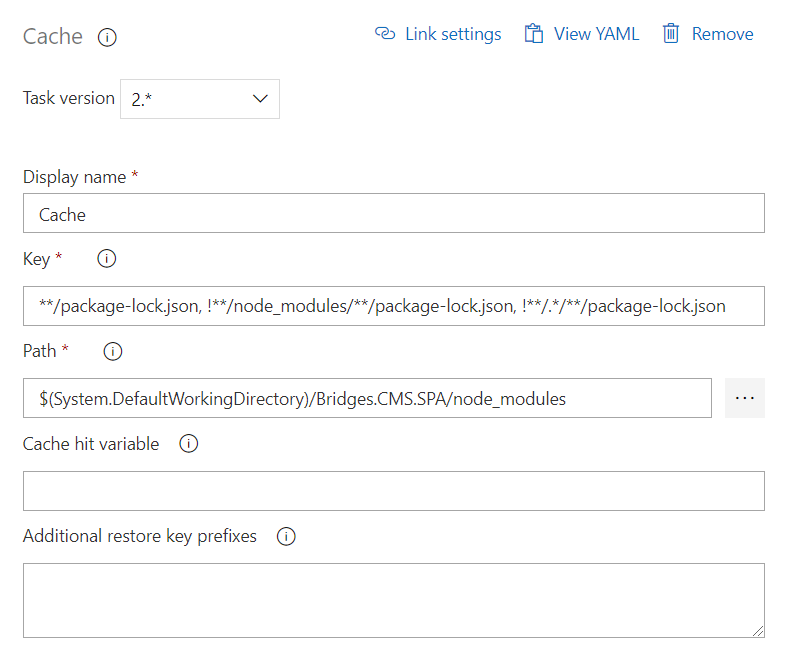
  • Now we first need to set a cache key. The cache key is be used as the identifier for the cache and can be a combination of string values, file paths and file patterns. In our case we want to use the package-lock.json file as the key. Every time the package-lock.json changes the cache will be invalidated and the npm packages will be restored again.
    • **/package-lock.json, !**/node_modules/**/package-lock.json, !**/.*/**/package-lock.json
  • The second thing we need to set is the directory to populate the cache from and restore back to. As we want to cache the npm packages we cache the ‘node_modules’ folder:
    • $(System.DefaultWorkingDirectory)/Bridges.CMS.SPA/node_modules

Now if we build again, the first time the cache is populated and the second time we win a lot of time as the node_modules folder is restored from the cache. Yippie!


Popular posts from this blog

Azure DevOps/ GitHub emoji

I’m really bad at remembering emoji’s. So here is cheat sheet with all emoji’s that can be used in tools that support the github emoji markdown markup: All credits go to rcaviers who created this list.

Kubernetes–Limit your environmental impact

Reducing the carbon footprint and CO2 emission of our (cloud) workloads, is a responsibility of all of us. If you are running a Kubernetes cluster, have a look at Kube-Green . kube-green is a simple Kubernetes operator that automatically shuts down (some of) your pods when you don't need them. A single pod produces about 11 Kg CO2eq per year( here the calculation). Reason enough to give it a try! Installing kube-green in your cluster The easiest way to install the operator in your cluster is through kubectl. We first need to install a cert-manager: kubectl apply -f https://github.com/cert-manager/cert-manager/releases/download/v1.14.5/cert-manager.yaml Remark: Wait a minute before you continue as it can take some time before the cert-manager is up & running inside your cluster. Now we can install the kube-green operator: kubectl apply -f https://github.com/kube-green/kube-green/releases/latest/download/kube-green.yaml Now in the namespace where we want t...

Podman– Command execution failed with exit code 125

After updating WSL on one of the developer machines, Podman failed to work. When we took a look through Podman Desktop, we noticed that Podman had stopped running and returned the following error message: Error: Command execution failed with exit code 125 Here are the steps we tried to fix the issue: We started by running podman info to get some extra details on what could be wrong: >podman info OS: windows/amd64 provider: wsl version: 5.3.1 Cannot connect to Podman. Please verify your connection to the Linux system using `podman system connection list`, or try `podman machine init` and `podman machine start` to manage a new Linux VM Error: unable to connect to Podman socket: failed to connect: dial tcp 127.0.0.1:2655: connectex: No connection could be made because the target machine actively refused it. That makes sense as the podman VM was not running. Let’s check the VM: >podman machine list NAME         ...