
Make your ASP.NET Core application always running on IIS

By default when running an ASP.NET Core application in IIS, the application will not be started until the first user hits your ASP.NET Core application. This of course saves some resources(CPU, memory,...) when no one is accessing your site, but comes with a performance penalty when the first request arrives.

A related feature exists where the application pool is shutdown after some idle time.

Although I think this is a good default it is not what we want when we have one or more background tasks running in our ASP.NET Core application. In these situations you want to have your ASP.NET Core application always running.

Let me walk you through the steps how to get this done.

Install IIS features

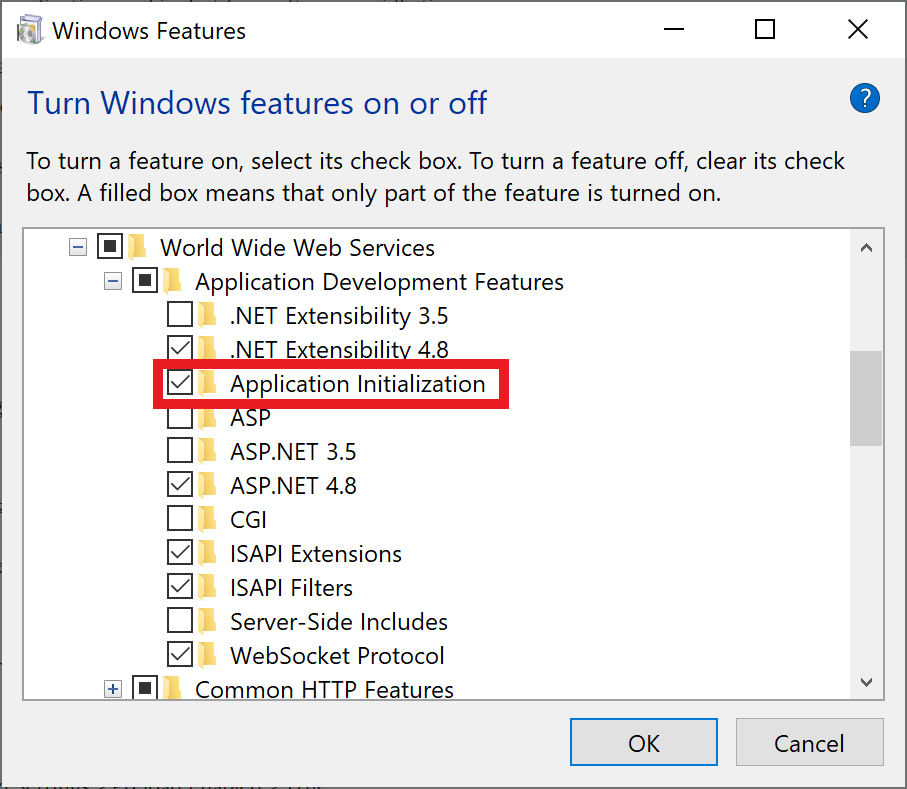
First check if you have the Application Initialization Module installed in IIS. If you are doing this on your local development machine, have a look at the list of Windows Features:

Otherwise you can install it through Server Manager:

  • Open the Add Roles and Features Wizard.
  • In the Select role services panel, open the Application Development node.
  • Select the checkbox for Application Initialization.

Configure IIS

Now we need to configure IIS. Start by opening the IIS Manager.

We start by configuring the Application pool:

  • Select Application Pools in the Connections panel.
  • Right-click the app's app pool in the list and select Advanced Settings.
  • The default Start Mode is OnDemand. Set the Start Mode to AlwaysRunning.
  • Also update the Idle Time-Out (minutes) to 0.
  • Select OK.

Now we need to also update the website to activate the preload feature:

  • Open the Sites node in the Connections panel.
  • Right-click the app and select Manage Website > Advanced Settings.
  • The default Preload Enabled setting is False. Set Preload Enabled to True.
  • Select OK.

    Configure your ASP.NET Core app

    There is not much you need to do at the level of your ASP.NET Core application. The only thing that is required is that your are using the In-Process hosting model which is the default.

    More information can be found at:

    Popular posts from this blog

    Azure DevOps/ GitHub emoji

    I’m really bad at remembering emoji’s. So here is cheat sheet with all emoji’s that can be used in tools that support the github emoji markdown markup: All credits go to rcaviers who created this list.

    Kubernetes–Limit your environmental impact

    Reducing the carbon footprint and CO2 emission of our (cloud) workloads, is a responsibility of all of us. If you are running a Kubernetes cluster, have a look at Kube-Green . kube-green is a simple Kubernetes operator that automatically shuts down (some of) your pods when you don't need them. A single pod produces about 11 Kg CO2eq per year( here the calculation). Reason enough to give it a try! Installing kube-green in your cluster The easiest way to install the operator in your cluster is through kubectl. We first need to install a cert-manager: kubectl apply -f https://github.com/cert-manager/cert-manager/releases/download/v1.14.5/cert-manager.yaml Remark: Wait a minute before you continue as it can take some time before the cert-manager is up & running inside your cluster. Now we can install the kube-green operator: kubectl apply -f https://github.com/kube-green/kube-green/releases/latest/download/kube-green.yaml Now in the namespace where we want t...

    Podman– Command execution failed with exit code 125

    After updating WSL on one of the developer machines, Podman failed to work. When we took a look through Podman Desktop, we noticed that Podman had stopped running and returned the following error message: Error: Command execution failed with exit code 125 Here are the steps we tried to fix the issue: We started by running podman info to get some extra details on what could be wrong: >podman info OS: windows/amd64 provider: wsl version: 5.3.1 Cannot connect to Podman. Please verify your connection to the Linux system using `podman system connection list`, or try `podman machine init` and `podman machine start` to manage a new Linux VM Error: unable to connect to Podman socket: failed to connect: dial tcp 127.0.0.1:2655: connectex: No connection could be made because the target machine actively refused it. That makes sense as the podman VM was not running. Let’s check the VM: >podman machine list NAME         ...