Git offers a wide range of possibilities to discard local changes. In this post I like to share some of the available options. Before I dive into the details, it is important to make the distinction between untracked and tracked files.
From the documentation:
Git has something called the "staging area" or "index". This is an intermediate area where commits can be formatted and reviewed before completing the commit.
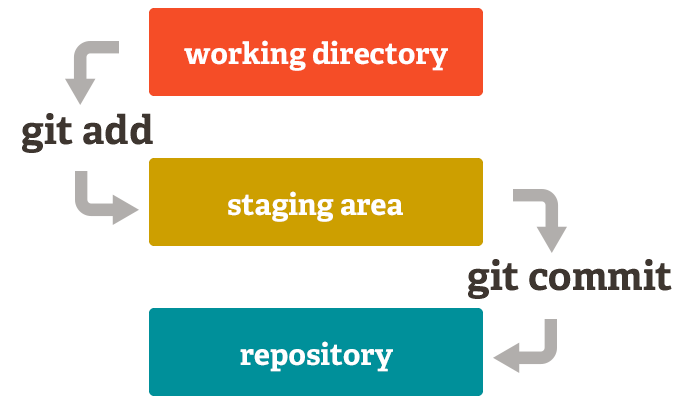
Untracked files live in the git working directory but are not managed by git until you stage them.
Tracked files
Here are some options to discard changes in tracked files:
-
Discard Changes in a Specific File: If you want to discard changes in a specific file, you can use the following command:
git checkout -- filenameThis will replace the changes in the specified file with the last committed version of that file.
-
Discard Changes in All Modified Files: To discard changes in all modified files in the working directory, you can use the following command:
git checkout -- .The
.specifies the current directory, and this command will discard changes in all modified files. -
Discard Uncommitted Changes and Switch Branch: If you want to switch branches and discard any uncommitted changes, you can use the following command:
git checkout -f branch_nameReplace
branch_namewith the name of the branch you want to switch to. The-f(or--force) option is used to discard changes. -
Stash Changes: Another option is to use Git stash to save your changes temporarily, switch to a different branch, and then apply or drop the stash based on your needs:
# Save changes to a stashgit stash
# Switch to a different branch
git checkout branch_name
# Apply the stash to the new branch if needed
git stash apply
# Or, if you don't need the stash anymore
git stash drop
Untracked files
If you have untracked files that you want to remove, you can use the git clean command. Be cautious with this command, as it permanently deletes untracked files.
git clean -f
The -f (force) option is required to perform the clean operation.
If you want to remove both untracked files and directories, you can use the -d option:
git clean -fd
Always be careful when using git clean as it permanently deletes untracked files, and there's no easy way to recover them.
If you want to remove untracked files from the working directory but keep them in the repository (i.e., you don't want them to be tracked), you can use the following command:
git clean -fX
This will remove only the untracked files but not untracked directories. The -X option tells Git to remove only the files that are not listed in the .gitignore file.