
MassTransit–Using RabbitMQ Virtual Hosts

Today I want to talk about a specific feature in RabbitMQ and how we can use this feature with my favorite messaging library MassTransit.

Virtual Hosts

With virtual hosts you can create a logical grouping in  your RabbitMQ cluster. Every exchange, queue, binding, user permissions, and so on is bound to a specific virtual host and isolated from the other virtual hosts. This helps to avoid naming collisions.

There is always at least one virtual host in use; the default one is ‘/’.

To create a new virtual host in your RabbitMQ cluster, you can use the rabbitmqctl's add_vhost command:

rabbitmqctl add_vhost development

Or you can use the RabbitMQ Management portal:

  • In the Management Portal go to the Admin tab and click on the Virtual Hosts section on the right:

  • Go to the Add Virtual Host form and enter a name and an optional description and tags:

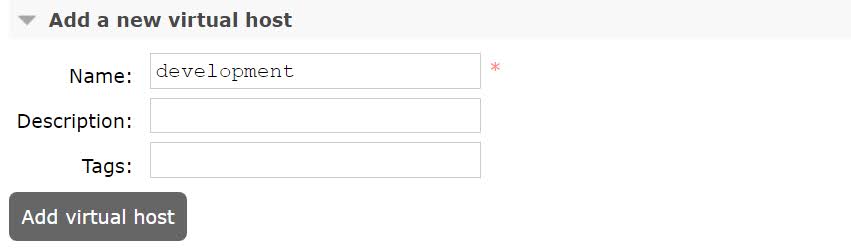
  • Click on Add virtual host to create the new virtual host.

Remark: Be aware that virtual hosts are a security boundary, so I would recommend to create different users per virtual host.

Using Virtual Hosts in MassTransit

Now that we have a new Virtual Host created, let’s see how we can use this in MassTransit.

Let’s have a look at a simple example from the MassTransit documentation:

In the example above, the virtual host is passed as a second parameter after the servername in the Host() method:

You can also specify it through the URI:

Popular posts from this blog

Podman– Command execution failed with exit code 125

After updating WSL on one of the developer machines, Podman failed to work. When we took a look through Podman Desktop, we noticed that Podman had stopped running and returned the following error message: Error: Command execution failed with exit code 125 Here are the steps we tried to fix the issue: We started by running podman info to get some extra details on what could be wrong: >podman info OS: windows/amd64 provider: wsl version: 5.3.1 Cannot connect to Podman. Please verify your connection to the Linux system using `podman system connection list`, or try `podman machine init` and `podman machine start` to manage a new Linux VM Error: unable to connect to Podman socket: failed to connect: dial tcp 127.0.0.1:2655: connectex: No connection could be made because the target machine actively refused it. That makes sense as the podman VM was not running. Let’s check the VM: >podman machine list NAME         ...

Azure DevOps/ GitHub emoji

I’m really bad at remembering emoji’s. So here is cheat sheet with all emoji’s that can be used in tools that support the github emoji markdown markup: All credits go to rcaviers who created this list.

VS Code Planning mode

After the introduction of Plan mode in Visual Studio , it now also found its way into VS Code. Planning mode, or as I like to call it 'Hannibal mode', extends GitHub Copilot's Agent Mode capabilities to handle larger, multi-step coding tasks with a structured approach. Instead of jumping straight into code generation, Planning mode creates a detailed execution plan. If you want more details, have a look at my previous post . Putting plan mode into action VS Code takes a different approach compared to Visual Studio when using plan mode. Instead of a configuration setting that you can activate but have limited control over, planning is available as a separate chat mode/agent: I like this approach better than how Visual Studio does it as you have explicit control when plan mode is activated. Instead of immediately diving into execution, the plan agent creates a plan and asks some follow up questions: You can further edit the plan by clicking on ‘Open in Editor’: ...