Chrome HTTPS error on localhost: NET::ERR_CERT_COMMON_NAME_INVALID

If you are a developer and are using a Self-Signed certificate for your HTTPS server, you recently may have seen the following error in Chrome(or a non-Dutch equivalent Winking smile):

image

Starting from Chrome 58 an extra security check got introduced that requires certificates specify the hostname(s) to which they apply in the SubjectAltName field. After they first introduced this change, the error message was not very insightfull but today if you take a look at the Advanced section of the error message or the Security panel in the Developer tools, you’ll get some more details pointing to the SubjectAltName issue:

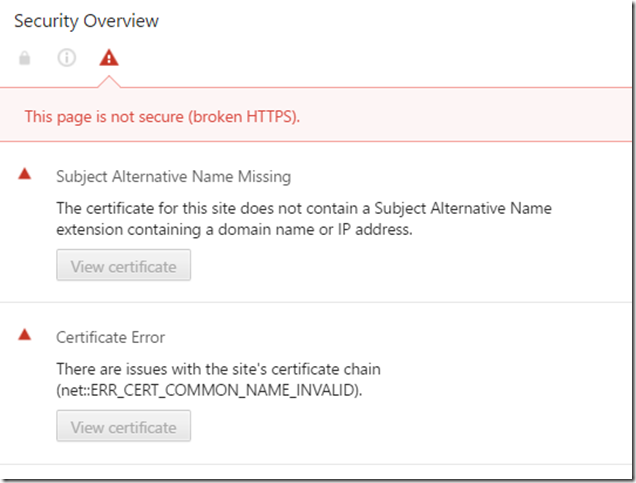
image

image

Create a new self-signed certificate

To fix it, we have to create a new self-signed certificate. We can not use the good old makecert.exe utility as it cannot set the SubjectAltName field in certificates. Instead, we’ll use the  New-SelfSignedCertificate command in PowerShell:

New-SelfSignedCertificate `
    -Subject localhost `
    -DnsName localhost `
    -KeyAlgorithm RSA `
    -KeyLength 2048 `
    -CertStoreLocation "cert:CurrentUser\My" `
    -FriendlyName "Localhost certificate"
Now you have a new certificate with a correct Subject Alternative Name in your Personal certificate store:
image
Next step is to trust this certificate by moving it to the Trusted Root Authorities. You can either do this by hand using the certmgr tool in Windows or script it with Powershell as well:
# set certificate password here
$pfxPassword = ConvertTo-SecureString -String "YourSecurePassword" -Force -AsPlainText
$pfxFilePath = "c:\tmp\localhost.pfx"
$cerFilePath = "c:\tmp\localhost.cer"

# create pfx certificate
Export-PfxCertificate -Cert $certificatePath -FilePath $pfxFilePath -Password $pfxPassword
Export-Certificate -Cert $certificatePath -FilePath $cerFilePath

# import the pfx certificate
Import-PfxCertificate -FilePath $pfxFilePath Cert:\LocalMachine\My -Password $pfxPassword -Exportable

# trust the certificate by importing the pfx certificate into your trusted root
Import-Certificate -FilePath $cerFilePath -CertStoreLocation Cert:\CurrentUser\Root

Import it in IIS

OK, almost there. A last step to get it working in IIS is to import the pfx in IIS:

  • Open IIS using inetmgr.
  • Go to Server Certificates.

image

  • Click on the Import… action on the right. The Import certificate screen is shown.

image

  • Select the pfx, specify the password and click OK.
  • Now that the certificate is available in IIS, you can change the bindings to use it. Click on the Default Web site(or any other site) on the left.
  • Click on the Bindings… action on the right. The Site Bindings screen is shown.

image

  • Click on the https item in the list and choose Edit… . The Edit Site Binding screen is shown.

image

  • Select the newly created SSL certificate from the list and click OK.

Popular posts from this blog

Podman– Command execution failed with exit code 125

After updating WSL on one of the developer machines, Podman failed to work. When we took a look through Podman Desktop, we noticed that Podman had stopped running and returned the following error message: Error: Command execution failed with exit code 125 Here are the steps we tried to fix the issue: We started by running podman info to get some extra details on what could be wrong: >podman info OS: windows/amd64 provider: wsl version: 5.3.1 Cannot connect to Podman. Please verify your connection to the Linux system using `podman system connection list`, or try `podman machine init` and `podman machine start` to manage a new Linux VM Error: unable to connect to Podman socket: failed to connect: dial tcp 127.0.0.1:2655: connectex: No connection could be made because the target machine actively refused it. That makes sense as the podman VM was not running. Let’s check the VM: >podman machine list NAME         ...

Cache stampede: when our cache turned against us

While investigating some performance issues, we ran into an ASP.NET Core API that cached a fairly expensive aggregation query for 60 seconds. Under normal load, that was fine: one request rebuilds the cache, everyone else reads from it. Under peak load, dozens of requests would arrive in that same expiry window, all see a cache miss, and all fire the same expensive query in parallel. The database didn't like that. That was the moment when our caching layer stopped helping and started hurting. A burst of requests comes in at the same time, all miss the cache, and all go hammer the database or the downstream API at once. That's a cache stampede . The cache was supposed to protect our backend, and for a few hundred milliseconds it did the opposite. Why this happens IMemoryCache.GetOrCreate (and its async sibling) looks like it protects you, but it doesn't add any locking on its own. Look at the naive version: public async Task<Report> GetReportAsync(string key) ...

A complex system designed from scratch never works

A few years ago, I worked as an architect on a big mainframe rewrite. I still count it as one of my failures. Not because the technology was wrong, but because I couldn't convince the management team to simplify the approach. Years later, the organization is still struggling to get the new system up and running. I left the project at the time, because I couldn't put my name behind an approach that would take very long and cost a lot of money without a working system to show for it along the way. Gall’s Law That memory keeps coming back to me, because it's a textbook case of Gall's Law playing out in real life. Gall's Law , from John Gall's Systemantics , states it plainly: A complex system that works is invariably found to have evolved from a simple system that worked. A complex system designed from scratch never works, and it cannot be patched to make it work. You have to start over with a simple system that works. What does that mean in practice,...